Wednesday, July 27, 2011

Chicken Souvlaki Pitas with Tahini Sauce

One of my favorite meals!  This is SO good.  Serve with Baba Ghanoush and Baked Pita Chips for a complete meal!
Ingredients:
  • One recipe of Tahini Sauce
  • 2 teaspoons fresh lemon juice
  • 1 tablespoon Extra Virgin Olive Oil
  • 1 teaspoon dried oregano
  • 1/4 teaspoon salt
  • 1/4 teaspoon freshly ground black pepper
  • 1 pound chicken breast pieces, cut into one inch chunks
  • Cucumber slices
  • Shredded lettuce
  • Pita bread
Directions:
  1. Combine lemon juice, olive oil, oregano, salt, pepper, and chicken pieces in a bowl.  Toss well.
  2. Spray a pan with non-stick spray, and heat on medium.
  3. Add chicken mixture and cook until done.  Flipping every few minutes. 
  4. Remove chicken from pan.
  5. Split pitas in half and then CAREFULLY separate the bread.  It will create a pocket.
  6. In the pocket put cucumbers down one side, shove lettuce in the bottom, and place chicken on top. You can add tomatoes if you want.  I am anti-raw tomatoes.  That is why mine is tomato free.
  7. Top with the tahini sauce.
Enjoy!

Recipe from Cooking Light March 2011

Pita Chips.

Pita chips are SO easy to make and this way they end up not being fried!

So easy.  Feel free to add other spices to spice it up!

Ingredients:
  • Pita
  • Olive Oil
  • Kosher Salt
Directions:
  1. Heat oven to 400*F
  2. Cut each pita into 8 triangles.
  3. Brush/spray with olive oil.  I have an olive oil mister and found that it works wonderfully and just puts a light coating on each one.
  4. Sprinkle lightly, or heavily you are the one that has to eat them, with kosher salt.
  5. Bake for 5-7 minutes until crisp.  Keep an eye on them.  They will burn easily.
Enjoy with your favorite dip!

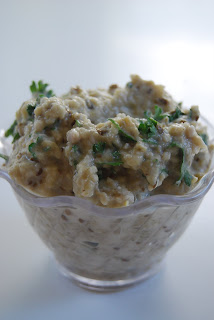
Baba Ghanoush

Years ago I dated a Lebanese guy.  We went to a Middle Eastern deli and I was introduced to a food from the Gods....baba ghanoush.  The literal translation he told me was "spoiled father".  Then later he told me it was eggplant and other stuff mixed up. I prefer the first description.

This recipe does take planning and time.  Make sure you factor in the baking of the eggplant and draining.  In all that takes 1 hour 45 minutes.  This does not include chopping, scooping, mixing.

Ingredients:
  • 1 large eggplant (about 1 1/2 pounds)
  • Cooking spray
  • 1/4 cup pine nuts, toasted
  • 3/4 teaspoon cumin, ground
  • 1/2 teaspoon minced garlic
  • 3 tablespoons fresh lemon juice
  • 2 tablespoons low-fat mayonnaise
  • 2 tablespoons tahini (roasted sesame seed paste)
  • 1 teaspoon kosher salt
  • 1/4 teaspoon freshly ground black pepper
  • 3 tablespoons chopped fresh parsley 
Directions:
  1. Preheat oven to 375*F
  2. Wash eggplant and pierce with a fork numerous times all around.  Great time to get out your aggressions!
    3.  Place on a lined, with aluminum foil, baking sheet coated with cooking spray.
    4.  Bake for 45 minutes or until soft.
Once baked it gets really soft and wrinkly
      5.  Cut eggplant in half and scoop out the middle.
   6.  Place in a colander and let drain for 30 minutes.
    7.  In a food processor place pine nuts, cumin, and garlic.  Pulse until finely
         chopped. 
    8.  Add eggplant, lemon juice, 2 tablespoons mayonnaise, tahini, 1 teaspoon salt,
         and black pepper to food processor. Process until smooth.
    9.  Spoon eggplant mixture into a medium bowl; stir in parsley.

GORGE.

Recipe From Cooking Light July 2010

Tahini Sauce

Tonight's dinner contains multiple parts.  Here is the first one.  Tahini sauce.  There are many variations and this is mine!  Enjoy!
Ingredients:
  • 1 tablespoon lemon juice
  • 1 1/2 tablespoons Tahina
  • 6 tablespoons PLAIN Greek Yogurt
  • 3 tablespoons shredded cucumber
  • 5 cloves garlic, minced
Who would think that just this could make something SO tasty?

Directions:
Mix all ingredients together in a small bowl and set aside.  If you are not using this right away I would recommend to place in the refrigerator.

Enjoy!
Recipe from Cooking Light March 2011

Tuesday, July 26, 2011

Chocolate Chip and M&M Cookies

If you are like me you have a bunch of half used bags of chocolate chips. 
I am on the mission to:
a) use up said chips
b) develop the best chocolate chip cookies ever.

This is my first attempt.
Ingredients:
  •  2 1/2 cups all-purpose flour
  • 1 teaspoon baking soda
  • 1/2 teaspoon salt
  • 1 cup (2 sticks) unsalted butter softened
  • 1 cup packed light brown sugar
  • 1/2 cup granulated sugar
  • 2 eggs
  • 1 tablespoon vanilla
  • 1 bag mini M&M's
  • 1 cup mixture of leftover chips (I used Ghirardelli semisweet chips and Tollhouse mini chips)

UNSALTED and farm fresh eggs.
My random bags.

Directions:
  1. Preheat oven to 350*F
  2. Stir together the flour, baking soda, and salt in a medium bowl.
  3. Beat the butter and two sugars together in a large bowl with an electric mixer at medium speed until light and fluffy.
  4. Add the flour mixture and beat until well blended. DO NOT add all at once unless you want a large mess to clean up.  I added mine in thirds.
  5. Stir in all your chips.


      6.  Drop by tablespoonfuls onto an ungreased cookie sheet.  If you don;t have one, I HIGHLY
           recommend you get a cookie scoop.  They make cookie making easy.  Your cookies are
           always the same size so they all cookie evenly!  I use the tablespoon size.
      7.  Bake for 8 to 10 minutes or until the edges are golden brown. 
      8.   Check on your cookie monsters:
NOT SO CLOSE!!!

     8.  Cool cookies on a cookie sheet  for 2 minutes.
   DO NOT skip the cooling part.  If you do, this can happen:
     9. Have a cookie and milk break and watch your three year old try to nibble all the M&Ms out.

Chocolate Chip Oat Bars


These are fabulous AND since it has oatmeal in it, you get to pretend it is healthy for you!  Score on two points!
 Ingredients:
1 cup all-purpose flour
1/2 teaspoon baking soda
1/2 teaspoon salt
1 cup packed light brown sugar
1/2 cup (1 stick) unsalted butter, softened
1 egg
1 tablespoon water
1 teaspoon vanilla
1 1/2 cups uncooked old-fashioned oats
1 cup semisweet chocolate chips (I used Ghirardelli)
Make sure you get your helpers!

Directions:
  1. Preheat oven to 375*F. Grease pan.  I used a 8"x11" glass baking dish.  A 9" square would work as well.
  2. Combine flour, baking soda, and salt in a small bowl.
  3. Beat sugar and butter in a large bowl with an electric mixer until creamy.
  4. To the sugar mixture add the egg, water, and vanilla.  Beat until well blended.
  5. Add the flour mixture and oats to the butter mixture.  Mix well with a spoon!  It is getting thick!
  6. With a spoon stir in 1/2 cup chocolate chips.  Spread dough into the baking dish and press down with a wooden spatula.  
  7. Sprinkle remaining chocolate chunks on top.
     8.  Bake for about 30 minutes.  You need to check and make sure the center is
            firm.  Mine took about 32 minutes.
     9.  Remove from oven and place on a wire rack to cool completely.

   10.  Serve with a LARGE glass of milk.

Sunday, July 24, 2011

Kale Chips

I had extra kale left over from the salad.  So you know what they say...When life gives you kale you make kale chips!

My snack.  Can you tell I have a house full of kids?
Ingredients:
  • Kale
  • Olive Oil
  • Kosher Salt, to your taste preference
Directions:
  1. Heat oven to 300*F
  2. Wash kale, dry, derib, and cut into bite size pieces.


       3.Add kale to a bowl
       4.  Pour in the Olive Oil and salt.
       5.  Toss well.
       6.  Put on baking sheet.


     7.  Bake for about 20 minutes, or until crisp.  Make sure you don't burn it!
It shrivels a lot!
   
     8.  Remove from oven and let cool for 10 minutes.

Enjoy your snack!

Kale Salad...Also knows as YUM!

Not gonna lie.  Kale scared me a bit.  But I found a recipe on Hello Giggles and figured it looked decent enough so I would give it a whirl.

I changed it a bit to suit my needs.  I am VERY anti-fresh tomatoes.  I tried one today to "check it out".  The verdict?  Still nasty.  I added some to my husbands though, he likes them. 

I now present to you...Kale Salad!!


Ingredients:
Fun from the produce aisle!

Packaged Ingredients Needed

  •  1 large bunch kale, rinsed and chopped into bite size pieces
  • 10 cherry tomatoes cut in half
  • 10 Greek Olives cut in half
  • 1/3 cup Sprouts
  • 2 avocados, peeled and cut into pieces.
  • 1/3 cup chopped pecans
  • 3 tablespoons hummus
  • 1 large lemon
  • 1 tablespoon white vinegar
  • 1/3 cup feta cheese
  • 2 tablespoons Extra Virgin Olive Oil
Directions:
  1.  In a small bowl whisk together hummus,  juice from the lemon, and the white vinegar.  Set aside.
  2. Place kale in a large bowl.  Add tomatoes, olives, sprouts, avocados, pecans, and feta.  Mix well.
  3. Add Olive Oil and toss.
  4. Pour dressing over the top and mix again.  Make sure to REALLY scrape the bottom of the bowl.  All my good stuff hid down there!
Enjoy!!

Friday, July 22, 2011

Soda Cake!

I have to admit.  I was VERY skeptical about this cake.  I still can not figure out how just two ingredients make this happen.   
Eggs?
Oil?

Nope.

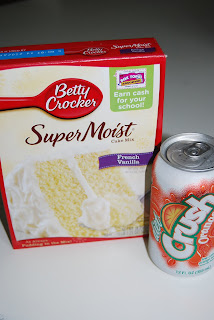
Just a box of cake mix and a can of soda.  Weird, right?  But it turned out awesome!  It had the consistency of an angel food cake.  Light and fluffy and has that sticky quality to it.  I made mine with French Vanilla Cake mix and Diet Orange Crush soda.  I have heard that the key to this is use dark soda with dark cake (Coke with chocolate cake) or light soda with light colored cake.  Like mine!

Oh...so good no icing is needed!

Ingredients:
Box of cake mix
Can of soda

For mine I did French Vanilla and Diet Orange Crush.  Not sure if you HAVE to use diet, but helps with the amount of sugar!


Directions:
Pour soda into the cake mix and follow directions on the box without adding anything else.  All done. 

For mine:
Pour soda in the cake mix.

It was rather neat how bubbly/foamy it got.  The foam stayed until I mixed it.  Definitely cool part for the kiddos.

Mix 30 seconds on low speed, then mix 2 minutes on medium speed.
The blender being pulled out ALWAYS pulls him in.  Don't mind his hair.  We are getting it cut this weekend.  :)


Pour into cake pan, I did 9x13" glass pan (bottom sprayed with nonstick spray)
Give kids the beaters since there are no raw eggs in it.


Bake at 350F for 30-35 minutes.

My oven is typically warmer so I put it in for 28 minutes.  After checking with a toothpick it was still gooey, so I put it in for another 4 minutes.  Then is was done.

Remove from oven and cool.  No icing needed.  The pictures don't do it justice.  I couldn't get it out very easily since it is sort of sticky.  But it does taste fabulous!

Thanks Ashley for the idea and Becca for the flavor combination!

This combination tastes JUST like a Creamsicle.  YUM!

I would love to hear what combination you have tried!

Thursday, July 21, 2011

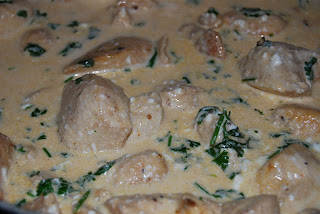
Creamy Cilantro Chicken

This is seriously one of my favorite meals.  The sauce is HEAVEN.  Probably all the butter, cream, and cheese.  I found this recipe when I was pregnant with Veronica.  I had Gestational Diabetes and I had to find low carb recipes fast.  I really did not want to spend the rest of my recipe eating baked chicken, 2 crescent rolls and broccoli (that was basically my dinner for a week.)

When I found this recipe I was SO excited.  It is super low carb and the sauce is even wonderful the next day.  I am not a big leftover girl, but throw a dash more cream and butter in the sauce the next day, cook some chicken breast tenders to throw in it and you are golden!  When ever I make this I double to sauce part.  I am going to write the recipe the way I found it.  If you want more sauce, just double it!

Make sure you do have something to soak up the sauce.  We either have brown rice, like tonight, or rolls.  Either way you do it, you can't do it wrong!


Ingredients:
4 boneless chicken breasts, cut into 1" pieces
3-oz. pkg. cream cheese
3/4 cup heavy whipping cream
Juice of 1 lime (or 1 Tbsp.)
McCormick's Rotisserie seasoning to taste (or other no-sugar brand)
Salt & pepper to taste
3 Tablespoons Butter
1/2 cup chopped (fresh) cilantro


Please take note of how cilantro looks.  My husband bought parsley once.  Totally not the same.

Directions:
Heat your pan to medium and melt the butter.
Brown the chicken in the butter.
While browning season the chicken with the salt, pepper, and rotisserie seasoning.
(No set amount. Just to you liking. I LOVE the rotisserie seasoning so I am very liberal with it.)
Why yes, that is chicken browning in tons of yummy butter!
When I flip my chicken I typically add more seasoning.  
Again, season to your liking.

Once the chicken is browned remove JUST the chicken from the pan.
To the butter add the heavy cream and the cream cheese.
I find this part works best if you chop the cream cheese into small cubes. It just melts easier.
Then add the chopped cilantro and lime juice.
***Tip:  Roll the lime on the counter first while pressing on it.  You will get more juice this way!
Then add the chicken back, with any remaining juices on your plate.

Cover and cook over low for about 15 minutes.

Viola!  Dinner is ready!

Sunday, July 17, 2011

Prune Baby Food

Prunes are baby food from the Gods.  Once your kiddo starts eating more then milk/formula things can be a bit "tough" for them.  I find myself cheering for V. "Push them out Push them out WAY OUT!"  TMI?

Anyway, if she gets prunes a lot, things are much better.  The only challenge I find in packaged baby prunes are you can't really find them past stage 1.  They also cost a crazy amount.  You can buy a container of prunes for less then $4.00 and so far I have made about 8 meals out of it and still have enough to make about 4 more servings.

So $4 versus about $14.00 (Amazon price).  Which do you think I chose?
Do I have something on my face?
Prunes are not cute and pretty, so I started with a picture of V enjoying her prunes.  Hope you don't mind.  :)

Ingredients:
1 cup of prunes
water (I used filtered, you could use spring)

I chose bite size, just so my Baby Bullet wouldn't hate me as much.
Put the prunes in a bowl and add warm water.  
I actually boiled my water and poured that on the prunes.
Before soaking
Let the prunes sit in the water until they soften.  I added water to mine and let them sit for about 2 hours.  Not because they needed that long, just because I had to run out to my sons class.

Once softened, remove from the water(Don't pour it out!) and place the prunes in your Baby Bullet, blender, processor, whatever you have to grind it up. 

After soaking-notice how they are less wrinkly?
PLEASE check your prunes for pits and pieces of pits!  They say they have removed the pits, but some make it through!  I know I pulled out a large one and you do NOT want to break any equiptment here.  Sort of defeats the purpose of saving money if you have to buy a new blender.

Start grinding the prunes.  For one cup I needed to add about 1/4 cup of the reserved water to get the consistency Veronica likes.  She is about 7 months at this point and does thicker foods.  Just add water to your desired thickness. 

Mmm....LUNCH!