Showing posts with label dinner. Show all posts

Thursday, October 27, 2011

Lemony Kale Pasta

I just signed up for my first CSA, Home Harvest,  this week!  I am really excited about all that I received.  The one I signed up for gives you to option to pick and choose what you want, so it is the perfect chance for me to try some new things!

Kale isn't a new veggie for me, but I just thought you would like to know what was going on in my kitchen.
I found this recipe on Annie's Eats and LOVE it.  So yummy.  I have had it a few times just to make sure I got good results every time and I did!  Hope you enjoy this as much as I do!
 Ingredients:
  • 2 cloves garlic
  • ½ tsp. kosher salt, divided
  • ½ cup finely grated Parmesan cheese (Confession-I used Kraft.  It was still awesome)
  • 6 tbsp. extra virgin olive oil
  • Juice of 2 lemons
  • ½ tsp. red pepper flakes (I like heat.  Feel free to reduce this amount)
  • Freshly ground black pepper, to taste
  • 1 lb. penne 
  • 1 large bunch kale, rinsed and dried, stems removed

Directions:
  1. Bring a large pot of water to boil for the pasta. 
  2. While you are waiting on the water to boil, make the dressing.  Mince the garlic cloves and sprinkle the minced garlic with ¼ teaspoon of the kosher salt. Smash the garlic into a paste with a fork or the side of a chef’s knife.  (Confession time!  I could not get this done to say my life.  I tried my hardest, but still had some lumps.  It was still good.  :)  Don't stress if you can't get it either.)  Transfer the garlic paste, or your attempt, to a small bowl.  Add in the Parmesan, olive oil, lemon juice, red pepper flakes and black pepper.  Whisk together until well combined.
  3. Cook the pasta in the boiling water according to the package directions.  Chop the kale into ½-inch ribbons.  Add the kale to a large bowl and toss with the dressing to coat well.  When the pasta is finished, drain well and let cool a minute or two.  Toss the pasta with the kale and dressing until well coated.  
Enjoy!!

Thursday, October 6, 2011

Sloppy Joe Grilled Cheese

WHY did I never think of this before??  I like sloppy joes.  I LOVE grilled cheese.  Perfect combo!  Thank you Pinterest for feeding my comfort food obsession!

 So.  I did not use a nonstick pan. VERY BAD IDEA.  This sucker will stick and stick HARD.  That is why the bottom piece looks a bit wonky.  But this sandwich was SO rocking I still posted it.  Yeah...it is THAT good.

Ingredients:
  • buns
  • cheddar - shredded
  • salted butter
  • sloppy joe meat at room temperature
Tools necessary:
  • NONSTICK PAN
  • straw
  • spatula
Directions:
 1.  Get your bun.  The original recipe used brioche.  My husband bought these.  Don't 
      know what type they are, but you get the idea.  Large thick buns.
2.  Slice the bun in half and then on the top part, cut off the very top.  Make sense? Eat 
     or discard the top. You want the bottom and the middle.
3.  Get your straw and poke holes in it.  Lots and lots of little tiny straw holes. Poke them
     in the top and bottom.  This is where the cheese will leak out of.  The more holes, the
     better.
4.  Top with cheese.
5.  Then meat on top and then more cheese.
6.  Then you want to take the bottom part of the bun and flip it over.  So the soft inside
     is on top, make sense?
7.  Butter both sides of the bread and put it on the pan.  You want to cook it on LOW 
    heat.Slowly brown it and the cheddar cheese will squirt out the holes and make the 
    bread have a crispy cheese crust on it.  NOM NOM NOM.  Each side will take about 7 
    minutes.This is definitely a knife and fork sandwich.


Enjoy!

Original recipe from The Grilled Cheese Social

Wednesday, September 21, 2011

Mexican DORITO Casserole.

Doritos.  Comfort food at it's finest.  There is nothing healthy about this recipe.  But it is SOOO good.
Ingredients:
  • 2 cups diced chicken
  • 1 cup shredded cheese (I did a mixture of Cheddar and Monterey Jack)
  • 1 can cream of chicken soup
  • 1/2 cup milk
  • 1/2 cup sour cream
  • 1 can Ro-tel tomatoes
  • 1/2 packet taco seasoning or 2 tablespoons homemade taco seasoning
  • Bag of Doritos (I used original)
  • 1/2 cup of cheese to sprinkle on top (I used more monterey jack)
Directions:
  1. Cook and dice chicken.
  2. Preheat oven to 350F
  3. Spray a 2 quart casserole with cooking spray.
  4. Mix all ingredients together in a bowl, except the Doritos and the 1/2cup of the cheese to sprinkle on top.
  5. Crush and sprinkle Doritos to cover the bottom of the casserole dish.  About 2 cups.
  6. Cover Doritos with half of the chicken mixture.
  7. Crush and sprinkle another two cups of Doritos on top.
  8. Cover with remaining chicken mixture.
  9. Sprinkle the remaining cheese on top.
  10. Cover the casserole and cook about 30 to 35 minutes until bubbling and heated through.
Enjoy!

Original recipe from Jam Hands

Saturday, September 3, 2011

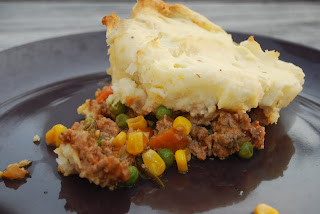
Shephards Pie

I LOVE the autumn.  I am hoping if I keep making autumn style foods, the weather will cool down faster.  It could work!!

What is more autumn sounding than a big pan of meat, vegetables, and topped with mashed potatoes?  This recipe was SO good.  I am super excited that I found it.  With the amount my husband consumed, I am pretty sure this is going to be a much requested recipe.

Please make sure to read the recipe through.  While the potatoes are cooking you start on the meat filling.  I noted that in the directions!

Ingredients:
For the potatoes:
  • 1 1/2 pounds russet potatoes
  • 1/4 cup half and half
  • 2 ounces unsalted butter
  • 3/4 teaspoon Kosher salt
  • 1/4 freshly ground black pepper
  • 1 egg yolk
For the filling:
  • 2 tablespoons Caonla oil
  • 1 cup chopped onion
  • 2 carrots, peeled and sliced thin
  • 2 garlic cloves, minced
  • 1 1/2 pound ground turkey
  • 1 teaspoon Kosher salt
  • 1/2 teaspoon freshly ground black pepper
  • 2 tablespoons all-purpose flour
  • 6 teaspoons crushed tomatoes ( or 2 teaspoons tomato paste.  I was out of the paste)
  • 1 cup vegetable broth
  • 1 teaspoon Worcestershire sauce (try to say it.  Bet you can't said it just once.)
  • 1 tablespoon freshly chopped rosemary leaves
  • 1 teaspoon freshly chopped thyme leaves 
  • 1/2 cup fresh or frozen corn kernels (I used canned)
  • 1/2 cup fresh or frozen peas
Directions: 
Make the potatoes:
  1. Peel the potatoes and cut into about 1/2in dice.  Put the diced potatoes into a medium size saucepan and cover with cold water.  
  2. Set over high heat, cover, and bring to a boil.  (Start making your meat filling at this point.  See below)
  3. Once boiling, remove cover and reduce heat to a simmer.  Cook until fork tender and easily crushable.  About 10-15 minutes.  Mine were perfect at 15 minutes. 
  4. Microwave the half and half and butter for 35 seconds, or until warmed. 
  5. Drain the potatoes and return them to the saucepan. 
  6. Mash the potatoes
  7. To the potatoes add the half and half, butter, salt, and pepper.  Mash until smooth your desired consistency.  I prefer a few lumps.  Seems just like how mom use to make it.  Lumpy potatoes.
  8. Stir in the egg yolk and set aside.
Make the meat Filling:
  1. Preheat oven to 400F
  2. Place the canola oil in a saute pan and set over medium heat.
  3. Once the oil heat up, add the onion and carrots and saute until they start to take color, about 3-5 minutes
  4. Add the garlic and stir to combine.
  5. Add the ground turkey, salt, and pepper.  Cook until browned and cooked through.
  6. Sprinkle the meat with the flour and toss to coat.  Cook for another minute.
  7. Add the crushed tomatoes, vegetable broth, Worcestshire, rosemary, and thyme.  Stir to combine.
  8. Bring to a boil, reduce heat to low, cover, and simmer for about 10-12 minutes.  You want your sauce to thicken slightly.
  9. Add the corn and peas and stir to combine.
  10. Spread mixture evenly in the bottom of your baking dish.  The dish should be about 11x7.
  11. Top with the mashed potatoes.  Start on the edges and go around, so you can make sure you get a good seal around the edges and to prevent the mixture from bubbling up.  Fill in the middle.
  12. Place on a foil lined cookie sheet and place on the middle rack of the oven for about 25 minutes or until the potatoes are golden on top.  Mine took about 30 minutes to achieve this.
  13. Cool for 10-15 minutes before serving.


Original recipe from Sadie + Stella

Thursday, September 1, 2011

Vegetarian Bean Burritos

I am trying to keep to somewhat of a budget in my house.  I don't really have one, but I try to get the grocery spending to a minimum.  I come up with the ideas and list and send the hubby to the store to do the shopping.  Meat is EXPENSIVE.  We don't do red meat or pork, but chicken can get just as pricey.  Result....vegetarian.  Which I don't have a problem with at all.

There is a local burrito place, Phat Burrito, that if I could eat at every day I would.  Their burritos are huge and awesome.  These are PRETTY darn tasty though.  It might make me rethink about going out for burritos!

Ingredients:
  • 1 cup brown or white rice (or 2 cups already cooked rice)
  • 2 tablespoons olive oil
  • 1 medium onion, diced
  • 3 cloves garlic, finely minced
  • 1 jalapeno, seeds and membrane removed, finely diced
  • 1 teaspoon cumin
  • Salt and pepper to taste
  • 3 tablespoons tomato paste
  •  1 can (15 oz.) pinto beans, drained and rinsed 
  • 1 can (15 oz.) black beans, drained and rinsed
  • 1 1/2 cups water
  • 1 can whole kernel corn, drained
  • 6 green onions, white and green parts finely chopped
  • 1/2 teaspoon garlic powder
  • 1/2 teaspoon onion powder
  • 16 burrito-sized (10-inch) flour tortillas
  • 2 cups shredded Monterey Jack cheese
Directions: 
Cook rice and set aside.

Heat oil in large saucepan over medium heat. Add onion, garlic, jalapeno and cumin. 
Season with salt and pepper. 
Cook, stirring occasionally, until onions are softened and golden, being careful not to let the garlic burn. 

Add tomato paste and cook, stirring for 1 minute.  
Drain and rinse one can of beans.  Add this to the pan and mash.  I used a potato masher.
After fully mashing add the second can of beans and water.  Stir to combine.
Bring to a boil.  Reduce heat to medium and simmer, stirring occasionally, until thickened about 10-12 minutes.  Make sure to stir it well.  You do not want this sticking to the bottom of the pan.
Add corn and cook until heated through, about 2 to 3 minutes.
Stir in the onion powder and garlic powder.
Remove from heat and stir in the green onions and cooked rice.

Follow the direction on the bag to heat the tortillas.

Now...this is the tricky part.  Each tortilla gets about 2/3 cup bean mixture and 1/4 cup cheese.  Put in on the tortilla near one side.  Fold the top down and bottom up slightly.  Then take the side closest to the filling and start rolling it over the filling TIGHTLY, rolling it towards the other end.  Mine turned out ok.  Not the prettiest things, but they tasted great!! 


Top with sour cream and salsa if desired.


Enjoy!!

This recipe makes a lot.  If you plan to freeze these, after rolling them up place on a cookie sheet and put the burritos in the freezer for about 30 minutes.

Once frozen, wrap them individually in plastic wrap and then place in a freezer bag for up to three months.

To reheat:
Remove from plastic wrap and poke a few holes in it.
Microwave for 2 minutes.
Poke a few more holes and microwave for another minute.  
This will be hot!  Be careful!

Original recipe from:  Mel's Kitchen Cafe


Thursday, August 25, 2011

Garlic Breadsticks, Olive Garden style

According to my son, everything is cheesy.  As in, it has lots of cheese in it.  These have NO cheese, but they sure were cheesy!  Never question a five year old when he is eating something new.  Just nod and say YES.

We typically have homemade pizza night once a week.  Super easy and quick to make.  I was getting really run down and bored with pizza night, so I decided to spice it up a bit and add some garlic bread.  I skipped on over to Pinterest and found a fabulous recipe.  This is from the blog Full Bellies, Happy Kids.

After reading on their blog a bit, I found at that they are having to move their blog due to people stealing their posts and using them as theirs, pictures and all.

It is a shame that people would stoop so low.  That is why I always take my own pictures and give credit to where credit is due.  As I said in my original post, I find recipes, make them to suit my family, and occasionally fiddle around with them enough to be able to claim them as mine.

This would not be that time.  Totally copied it.  Hope you like it!
Ingredients for the breadsticks:
  • 1 1/2 cups warm water (between 110 - 120 degrees F)
  • 2 1/4 teaspoons yeast (one package active dry yeast)
  • 4 1/4 cups all-purpose flour
  • 2 tablespoons unsalted butter, melted
  • 2 tablespoons sugar
  • 1 tablespoon salt 
Ingredients for the topping:
  • 1 stick of butter (1/2 cup)
  • 2 teaspoons garlic powder
  • 1 teaspoon salt
Directions:
  1. In a stand mixer dissolve the sugar and the yeast in the water.  Cover with a towel and let sit for about 10 minutes.  Mixture will become frothy.
  2. While waiting, in a separate bowl mix together the flour and salt.
  3. After the yeast sat for 10 minutes, remove the towel and add the flour mixture.
  4. Add the melted butter.
  5. If you have one, attach your dough hook to the mixer and turn it on 2.  Let it mix everything together, about 20 seconds, then knead the dough on setting 2 for about 2 minutes.  Be careful not to over mix.
  6. Spray a baking sheet with nonstick cooking spray, I used two pans, and divide the dough into pieces.  I made 10 sticks.  I will probably make them a bit smaller next time.  I'll try for 12.  That way I won't feel as guilty eating as many as i did. (Only 2)


     7.   Roll into log form and cover with a towel. Let it rest in a warm place, about 85F
           for about 45 minutes to an hour.  Outside on my picnic table was perfect for this 
           tonight.
     8.  Preheat your oven to 400F.  Once warm, put these in for about 6 minutes.  
     9.  While baking, in your microwave melt a stick of butter (1/2 cup) with 2 teaspoons
           garlic powder and 1 teaspoon salt.  When the timer goes off, brush the rolls with 
          half the butter mixture.
    10.  Put the sticks back in the oven for about 6-9 more minutes.  Just keep an eye on 
          them.  When browned, remove from the oven and brush with the remaining butter
           mixture.
ENJOY!!
      

Wednesday, August 24, 2011

Baked Ziti

My husband is obsessed with this stuff.  He always liked baked ziti, but wanted it cheesier.  This is what came about.  It is pretty freaking fabulous.
 Ingredients:
  • 1 pound ziti/rigatoni (any tubular noodles will do)
  • 15oz. Ricotta Cheese
  • 8 oz. Mozzarella Cheese, shredded
  • 1 egg, slightly beaten
  • 1 teaspoon salt
  • 1/4 teaspoon pepper
  • 3 1/2 cups spaghetti sauce
  • 1/4 cup Parmesan cheese OR shredded mozzarella cheese
  • a few fresh basil leaves sliced, optional
Directions: 
  1. Preheat oven to 375F
  2. Cook noodles according to package and drain
  3. Spread 1/2 cup spaghetti sauce in the bottom of a 13x9" baking pan. (I used a Pyrex one)
  4. In a large bowl mix the Ricotta Cheese, 8 oz mozzarella cheese, egg, salt, pepper, and 1 1/2 cups spaghetti sauce
  5. Add the noodles and stir into the cheese/sauce mixture.
  6. Gently pour the noodle mixture into the baking pan.
  7. Pour remaining spaghetti sauce onto the noodles.
  8. Sprinkle the additional 1/4 cup cheese on top and sprinkle the basil leaves.
  9. Bake for 30 minutes, or until bubbly and browned.
  10. Let cool for about 10 minutes.
ENJOY!!

Wednesday, August 17, 2011

Slow Cooker Spinach Pesto Lasagna

I never thought lasagna in a slow cooker could be so good.  I am the type of girl that spends HOURS, cutting vegetables, making the sauce, cooking the meat, assembling.  So I never would have in a million years thought that a lasagna that you just throw together and forget about in a slow cooker could be so good.

But it was.
Ingredients:
  • 1 (26-ounce) jar prepared pasta sauce 
  • 1 (10-ounce) box lasagna noodles (regular ones.  Not the no-boil ones.) 
  • Pesto, or you can buy some.  (11oz) 
  • 1 (15-ounce) container ricotta cheese 
  • 1 (12-ounce) bag baby spinach 
  • 1 cup grated Parmesan cheese 
  • 16 ounces mozzarella cheese, shredded 
  • 1/4 cup water
  • Slow Cooker.  Mine is a 6qt.
*Parmesan cheese is guesstimated.  I sprinkled until it looked good.

Directions:
  1. Put some of the sauce in the bottom of the slow cooker, about a 1/4cup and smooth it around.
  2. Cover the sauce with the RAW noodles.  You will have to break them to make it fit.  Rectangle noodle will not fit perfectly in a oval slow cooker, unless you are Chuck Norris and then the noodles will bend for you.
  3. Spread some ricotta on top of the noodles to cover.
  4. Spread some pesto on the ricotta.
  5. Sprinkle about 2 handfuls of baby spinach on top.
  6. Sprinkle the Parmesan Cheese.
  7. Sprinkle on the Mozzerella Cheese.
  8. Spread some pasta sauce.
  9. REPEAT until you use everything up ending with a cheese layer. I got three layers. 
  10. Take the 1/4 cup water and put it in the pasta jar.  Shake, then pour over the top.
  11. Cover and cook on high for 3 to 4 hours or low for about 6 hours. 
  12. It is done when the top is browned and bubbly.  It also pulls away from the sides a bit.  Let sit for 10-15 minutes before eating.   Enjoy!! 

Broccoli & Cheese Souffle

Holy Moly Batman.  These are GOOD.  I found this recipe and I was planning on making them for Veronica.  They sounded good and all.  The minute we gave them to her she started INHALING them.  I made my husband try it.  Just because I wanted to try it and it was labeled as a baby food recipe on the site I found it on and well...I am picky.  He tried it and said it was good.  I gave it a shot and let me tell you this is SOOOO good.  True babies can eat it, but I bet you will eat them too!

Ingredients:
  •  1 cup of ricotta
  • 1 cup mozzarella
  • 1/8 cup parmesean cheese
  • 1 10 ounce package of frozen chopped broccoli (I used florets and chopped them up well) 
  • 2 eggs (or 4 egg yolks)
  • 1 teaspoon of pre-minced garlic (Best invention EVER)
  • 1/2 teaspoon pepper
  • 1/2 teaspoon of fresh rosemary, chopped
  • 1/2 teaspoon of fresh basil, chopped
Directions:
  1. Thaw and drain the broccoli.  Make sure to get as much water out as possible.  I put mine between paper towels and smooshed it.
  2.  Preheat oven to 350F and spray a muffin tin with nonstick spray.
  3. In a bowl beat the eggs until foamy.  My hand mixer has a whisk attachment.  I used that.  It fluffed them up nice and quick.  You can also push down and make sure you get the stuff on the bottom foamy as well.
  4. Add the cheeses, pepper, and herbs.  I gave the mixture a quick beat with the whisk attachment again to mix it all together.
  5. Fold the broccoli into the egg/cheese mixture until just combined.
  6. Divide evenly in the muffin tins.  Mine filled all 12 holes halfway.
  7. Bake 20-30 minutes.  The original recipe said 20-25minutes.  I changed this a bit so mine had to stay in longer.  Mine went for 28 minutes.  From about the 20 minute point I would just keep an eye on them.
  8. Serve warm.  But I best these would be just as yummy chilled!

mmhmhmhmmm...

Tuesday, August 9, 2011

Salsa Chicken Slow Cooker Style!

Crazy crazy CRAZY easy recipe.  I saw different variations on a few different sites, so here is my variation!
Ingredients:
  • 1 pound boneless skinless chicken breasts
  • 1 can cream of chicken soup ( you could use mushroom.  I don't dig fungi.)
  • 1 cup salsa 
  • 1 can black beans, drained and rinsed
  • 1 package taco seasoning OR 2 tablespoons of homemade taco seasoning 
  • 1 cup sour cream 
  • cilantro (optional)
  • green onion (optional)
  • shredded cheese (optional)
Directions:
1.  In the slow cooker add the chicken, soup, salsa, beans, and taco seasoning.  Mix well
2.  Cook on high for 4 hours or low for 6 hours.
3.  If desired, remove chicken and shred.  Return to slow cooker.
4.  Mix in sour cream.
5.  Serve over rice and topped with your choice of toppings. 
Enjoy!

Saturday, August 6, 2011

Pumpkin Cream Cheese Ravioli in Sage and Butter Sauce

There are two things i love right now in the world.  This blog and Pinterest.  Why is this you ask?  Because of this blog I am being forced to expand my regular cooking routine and Pinterest is helping me do that.  I now base my meal planning around that.

Because of that, I found this wonderful recipe.  I did not really change anything other then the amount made.  Kinda perfect the way it was.
Ingredients:
  • 1 can of pumpkin puree (Make sure it is PURE pumpkin. NOT pie filling)
  • 4oz of cream cheese at room temperature
  • 1 teaspoon of cumin
  • salt and pepper to taste
  • Wonton wrappers
  • 4 tablespoons of butter
  • a few sage leaves
Directions:
  1. Mix together the pumpkin, cream cheese, cumin, salt, and pepper.
  2. Lay out your wonton wrappers.  Place a teaspoon amount in the center of each one.  Do not put too much in.  If  you do, it will squish out when you seal them.

     3.    Wet the edges with water.  I had a small glass with water and I dipped my
             finger in it and then just  ran  my finger around the edges.  You want it wet,
             but not drenched.
     4.  Fold the edges over and press to seal.  Make sure you get a tight seal
          to ensure the filling stays inside.


     5.  Repeat until all are filled.  I doubled the original recipe.  This recipe
          should use the whole pack of  wrappers.

   6.  At this point if you have more then you and your family can eat you can freeze
        them.  Place some flour on the bottom of a pan and place the raviolis onto the 
        flour.  Place in the freezer.  Once frozen you can transfer these to a freezer bag.
   7.  For the ones you will be eating now, place them in boiling salted water for 2 to 3 
        minutes.
   8.  Melt the butter in a pan with the sage.
   9.  Cook JUST until the butter browns.  You do not want it to burn.
  10.  Toss with the sauce and contemplate removing the others from the freezer to eat
          right now.
Enjoy!

Recipe from Closet Cooking

Tuesday, August 2, 2011

Slow Cooker Chicken Taco Soup

I know what you are thinking...SOUP?  It was 94 degrees today?!?  Are you crazy?
Yes.  Yes I am.
For this soup that is.  Someone I know posted it on a message board I frequent and I thought I would give it a try.  After checking over the recipe I noticed a few things I wanted to change and did.  :)  So...here is my version! WARNING!  I like spicy foods.  Feel free to reduce the taco seasoning! 

Ingredients:
  • 1 onion, chopped
  • 1 (16oz) can chili beans, undrained (mine was kidney beans with chili sauce-vegetarian)
  • 1 (15oz) can black beans, drained and rinsed
  • 1 (15 ounce) can whole kernel corn, drained
  • 1 (8 ounce) can tomato sauce
  • 12 ounces (1 1/2 cups) chicken broth
  • 2 (10 ounce) cans diced tomatoes with green chilies, undrained
  • 1/3 cup taco seasoning
  • 3 1/2 whole skinless, boneless chicken breasts
  • shredded cheese, optional
  • sour cream, optional
  • tortilla chips, optional
Directions:
  1. Add onion, chili beans, black beans, corn, tomato sauce, tomatoes, taco seasoning, and chicken broth to the slow cooker.   Stir well.
  2. Add the chicken breasts on top and push them down into the mixture until covered.
  3. Set slow cooker to low and cook for about 5 hours.
  4. Remove chicken breast and let them cool a bit.  Once cooled enough to handle, shred the breasts with two forks.  Then return the breasts to the slow cooker and stir.
  5. Cover and continue cooking for 2 more hours.
  6. Serve with shredded cheese, sour cream, and tortilla chips.

Wednesday, July 27, 2011

Chicken Souvlaki Pitas with Tahini Sauce

One of my favorite meals!  This is SO good.  Serve with Baba Ghanoush and Baked Pita Chips for a complete meal!
Ingredients:
  • One recipe of Tahini Sauce
  • 2 teaspoons fresh lemon juice
  • 1 tablespoon Extra Virgin Olive Oil
  • 1 teaspoon dried oregano
  • 1/4 teaspoon salt
  • 1/4 teaspoon freshly ground black pepper
  • 1 pound chicken breast pieces, cut into one inch chunks
  • Cucumber slices
  • Shredded lettuce
  • Pita bread
Directions:
  1. Combine lemon juice, olive oil, oregano, salt, pepper, and chicken pieces in a bowl.  Toss well.
  2. Spray a pan with non-stick spray, and heat on medium.
  3. Add chicken mixture and cook until done.  Flipping every few minutes. 
  4. Remove chicken from pan.
  5. Split pitas in half and then CAREFULLY separate the bread.  It will create a pocket.
  6. In the pocket put cucumbers down one side, shove lettuce in the bottom, and place chicken on top. You can add tomatoes if you want.  I am anti-raw tomatoes.  That is why mine is tomato free.
  7. Top with the tahini sauce.
Enjoy!

Recipe from Cooking Light March 2011

Saturday, July 16, 2011

Tater Tot Hotdish

This is one of the reasons I was asked to start this blog.  Tater tot hotdish.  What is hotdish you ask? AWESOMENESS!

No really.  According to wikipedia: it is a baked casserole that contains a starch, meat/protein, vegetables of some sort, and canned soup.

Did I loose you already?  How about this to keep you here?


Ingredients:
I forgot the can of Cream of Celery in this picture.  OOPS!

I like visual references. Can you tell??
 

1 (24 ounce) bag frozen tater tots
1 lb ground turkey burger
1 (12 ounce) can tomatoes with chilis (Rotel)
1 (12 ounce) can condensed cheddar or nacho cheese soup
1 (12 ounce) can condensed cream of chicken (or celery) soup
1 (12 ounce) can sweet corn (drained) or 1.5 cups frozen
1 (12 ounce) can black beans (drained and rinsed)
1 (12 ounce) bag four-cheese Mexican blend cheese
1 cup diced onion
1 tablespoon olive oil
2 cloves garlic
1/2 chopped red pepper
1 diced jalepeno pepper (seeded)

 Directions:
Heat onions and olive oil over medium heat for 4-5 minutes.  Make sure not to burn them!

Add chopped garlic, jalepeno and red pepper to onions and let cook for 2-3 minutes before adding turkey burger. Cook until browned, 6-8 minutes.


Drain the tomatoes, beans and corn and mix with the cans of condensed soup in a casserole dish.  I used a 13x9" glass dish.  It filled it.  Do NOT add any milk or water to the soup.  Use the soup straight from the can!!
Yummy.
After the meat is browned and the grease is drained, stir it in with the veggie/soup mixture. Cover with shredded cheese and top with frozen tater tots.  If you add more tater tots I will not tell.  I think the best part about this is the cheesy tots on top.  NOM!

Bake in the oven at 375°F until the tots are browned. About 35-40 minutes.


Still yummy reheated the next day, just not as pretty!

Recipe from House of Brinson