Thursday, November 3, 2011

Radish Top and Kale Soup

Oh...you are still here?  I figured the title post would scare you away.  So, in my CSA basket this week I received radishes.  The group I go through, I get to choose every week what I want.  So this week I decided to get some radishes.  I figured they would be like the ones at the grocery store.  Just little odd round balls.  BOY was I wrong.  These suckers are HUGE and the tops on them are even huger.  It seemed a waste to chuck all the pretty leaves in the trash so I was on a mission to find a recipe to use the leaves.

I found a few recipes.  One was for this soup and another is for a beet, carrot, and radish top salad.   I think I will try that one tomorrow.

Anyway.  I fiddled with the recipe enough to say that I made it up!  Always fun when that happens.  I will not be posting a picture of the finished soup first, because well, green creamy soup does not look that pretty.  But my radishes do!!
Ingredients:
  • 2 tablespoons butter, I used salted
  • 1 large onion, diced
  • 3 medium potatoes, sliced
  • 4 cups raw radish greens
  • 1 cup raw kale
  • 4 cups vegetable stock
  • 1/3 cup half and half
  • 1 to 2 tablespoons fresh rosemary, depending on taste.
  • pepper to taste
Directions:
  1. Melt butter in a large saucepan over medium heat.  I used a 2 1/2 quart size.  It was rather hard to stir all the greens in.  Larger than that would be ideal.
  2. Add onions to the butter and cook until tender.
  3. Add the sliced potatoes, radish tops, and kale.  Stir to coat all with the butter.  You don't have to worry about chopping all the leaves, because the soup will be blended at the end.
  4. Add the stock and rosemary.
  5. Heat to boiling, then reduce and simmer for 30 minutes.  
  6. Check and make sure the potatoes are tender.  If they are, let the soup cool for a few minutes.
  7. At this point you have a choice.  You can either pour this into a blender and blend OR use a hand held immersion blender.  That is what I used.  
  8. Once all blended, add the cream and stir.  Heat through and add pepper to taste.
All done!  I'll add a picture now, just so you can see what it looks like.  Looks much nicer in person!
Enjoy!

Thursday, October 27, 2011

Honey Whole Wheat Sandwich Bread (Bread Machine)


Finding a whole wheat sandwich bread recipe is a bit tricky.  Most are crazy dense and just blah.  I found this recipe, tweaked it a bit following other peoples recommendations and I think it is fabulous!  

For this recipe I used the whole wheat setting on my machine, 1 1/5 pound, and the medium crust setting.  The bread turned out wonderfully light and soft with a crusty crust, figure that!   

This is NOT a 100% whole wheat recipe.  It is 2/3 whole wheat and 1/3 bread flour.  But it is better than no whole wheat!   Feel free to play around with your whole wheat vs. bread flour ratio and let me know what you come up with.  I think this is wonderful though!  

Of course with this being a bread machine baked loaf it ends up being that odd rectangle shape.  Weird looking, but tastes great!

 
Ingredients:
  • 1 1/8 cup WARM water
  • 1/4 cup honey
  • 1/2 teaspoon salt
  • 2 tablespoons melted butter (I used salted)
  • 2 cups whole wheat flour
  • 1 cup bread flour
  • 1 1/2 teaspoons active dry yeast (Made for a bread machine)
Directions:
  1. Add ingredients into the bread machine as listed, or as your machine specifies.
  2. Set machine with these choices:  Whole Wheat, 1 1/5 pound, medium crust.
  3. Sit back and enjoy the smell while your bread is baking!
Tips:
  • Your water needs to be around 110F.  Too hot will kill the yeast and too cold won't activate it.
  • Make sure the salt is added in with the liquid ingredients.  
  • Do NOT let the yeast touch the liquid ingredients or the salt.
  • In the flour make  a small well and put the yeast in the well.  Do not let the liquid seep through.
  • After the machine mixes the dough the first time, quickly open the machine and scrape the edges down.  The machine will go through another mixing cycle. 
  • If there is remaining flour in the corners, it will end up being like that on the outside of your loaf and the corner will be a weird floury blob. <--Technical term.  :)
Grab a sharp serrated knife and slice in!  

Enjoy!

Lemony Kale Pasta

I just signed up for my first CSA, Home Harvest,  this week!  I am really excited about all that I received.  The one I signed up for gives you to option to pick and choose what you want, so it is the perfect chance for me to try some new things!

Kale isn't a new veggie for me, but I just thought you would like to know what was going on in my kitchen.
I found this recipe on Annie's Eats and LOVE it.  So yummy.  I have had it a few times just to make sure I got good results every time and I did!  Hope you enjoy this as much as I do!
 Ingredients:
  • 2 cloves garlic
  • ½ tsp. kosher salt, divided
  • ½ cup finely grated Parmesan cheese (Confession-I used Kraft.  It was still awesome)
  • 6 tbsp. extra virgin olive oil
  • Juice of 2 lemons
  • ½ tsp. red pepper flakes (I like heat.  Feel free to reduce this amount)
  • Freshly ground black pepper, to taste
  • 1 lb. penne 
  • 1 large bunch kale, rinsed and dried, stems removed

Directions:
  1. Bring a large pot of water to boil for the pasta. 
  2. While you are waiting on the water to boil, make the dressing.  Mince the garlic cloves and sprinkle the minced garlic with ¼ teaspoon of the kosher salt. Smash the garlic into a paste with a fork or the side of a chef’s knife.  (Confession time!  I could not get this done to say my life.  I tried my hardest, but still had some lumps.  It was still good.  :)  Don't stress if you can't get it either.)  Transfer the garlic paste, or your attempt, to a small bowl.  Add in the Parmesan, olive oil, lemon juice, red pepper flakes and black pepper.  Whisk together until well combined.
  3. Cook the pasta in the boiling water according to the package directions.  Chop the kale into ½-inch ribbons.  Add the kale to a large bowl and toss with the dressing to coat well.  When the pasta is finished, drain well and let cool a minute or two.  Toss the pasta with the kale and dressing until well coated.  
Enjoy!!

Thursday, October 6, 2011

Sloppy Joe Grilled Cheese

WHY did I never think of this before??  I like sloppy joes.  I LOVE grilled cheese.  Perfect combo!  Thank you Pinterest for feeding my comfort food obsession!

 So.  I did not use a nonstick pan. VERY BAD IDEA.  This sucker will stick and stick HARD.  That is why the bottom piece looks a bit wonky.  But this sandwich was SO rocking I still posted it.  Yeah...it is THAT good.

Ingredients:
  • buns
  • cheddar - shredded
  • salted butter
  • sloppy joe meat at room temperature
Tools necessary:
  • NONSTICK PAN
  • straw
  • spatula
Directions:
 1.  Get your bun.  The original recipe used brioche.  My husband bought these.  Don't 
      know what type they are, but you get the idea.  Large thick buns.
2.  Slice the bun in half and then on the top part, cut off the very top.  Make sense? Eat 
     or discard the top. You want the bottom and the middle.
3.  Get your straw and poke holes in it.  Lots and lots of little tiny straw holes. Poke them
     in the top and bottom.  This is where the cheese will leak out of.  The more holes, the
     better.
4.  Top with cheese.
5.  Then meat on top and then more cheese.
6.  Then you want to take the bottom part of the bun and flip it over.  So the soft inside
     is on top, make sense?
7.  Butter both sides of the bread and put it on the pan.  You want to cook it on LOW 
    heat.Slowly brown it and the cheddar cheese will squirt out the holes and make the 
    bread have a crispy cheese crust on it.  NOM NOM NOM.  Each side will take about 7 
    minutes.This is definitely a knife and fork sandwich.


Enjoy!

Original recipe from The Grilled Cheese Social

Slow Cooker Spiced Vanilla & Apple Steel Cut Oatmeal

Wowza...long title.  Did you get all that?  I am sure I have said this before but I LOVE OATMEAL!  There is really nothing better then a nice big steaming bowl of oatmeal on a brisk autumn morning.  Are you in the mood yet?

This oatmeal is SO good, yet not that pretty.  So therefore, no pictures.  Hope you understand. 

I made this oatmeal around 3pm.  It takes a recommended 5-6 hours in the slow cooker.  I am NOT waking up to start breakfast, so I made it late enough so I could have a small bowl for dessert before bed.  The steel cut oats retain their shape, I guess you could say, so you can reheat it just fine.  I added a touch of milk and an extra sprinkling of brown sugar before I heated it in the microwave.

The recipe I started with said it made 3 to 4 servings.  If you eat oatmeal on a regular basis I am sure you have seen how small the portion sizes are.  So I doubled the recipe.  I shouldn't have done that.  I now have a TON to eat.  So this will easily make 6-8 servings.  This would be a GREAT holiday morning breakfast!  Easy to make a feed a gang!

Let's do this thing.

Ingredients:
  • 2 cups steel cut oats
  • 8 cups water
  • 1 cup milk
  • 2 apples, cut into bite size pieces with the skin still on.  Just make sure to wash well.
  • 3 teaspoons vanilla
  • 1 teaspoon cinnamon
  • 1/2 teaspoon ground nutmeg
  • 1/2 teaspoon ground clove
  • 2 tablespoons brown sugar 
Directions:
  1. Mix all ingredients in the slow cooker.  Cover and cook LOW 5-6 hours.  NO LONGER.  
  2. Stir and Enjoy!   If reheating add an extra splash of milk and an extra sprinkle of brown sugar never hurt anyone.
Recipe inspired by Sweet Treats & More

Wednesday, September 21, 2011

Mexican DORITO Casserole.

Doritos.  Comfort food at it's finest.  There is nothing healthy about this recipe.  But it is SOOO good.
Ingredients:
  • 2 cups diced chicken
  • 1 cup shredded cheese (I did a mixture of Cheddar and Monterey Jack)
  • 1 can cream of chicken soup
  • 1/2 cup milk
  • 1/2 cup sour cream
  • 1 can Ro-tel tomatoes
  • 1/2 packet taco seasoning or 2 tablespoons homemade taco seasoning
  • Bag of Doritos (I used original)
  • 1/2 cup of cheese to sprinkle on top (I used more monterey jack)
Directions:
  1. Cook and dice chicken.
  2. Preheat oven to 350F
  3. Spray a 2 quart casserole with cooking spray.
  4. Mix all ingredients together in a bowl, except the Doritos and the 1/2cup of the cheese to sprinkle on top.
  5. Crush and sprinkle Doritos to cover the bottom of the casserole dish.  About 2 cups.
  6. Cover Doritos with half of the chicken mixture.
  7. Crush and sprinkle another two cups of Doritos on top.
  8. Cover with remaining chicken mixture.
  9. Sprinkle the remaining cheese on top.
  10. Cover the casserole and cook about 30 to 35 minutes until bubbling and heated through.
Enjoy!

Original recipe from Jam Hands

Tuesday, September 20, 2011

Clean Eating Pumpkin Pie Oatmeal

I LOVE cooler weather because that means OATMEAL!  I found a great blog with 100 oatmeal recipes.  I am going to be scrolling through there, trying them out, and posting my favorites.  The first one to be included is Pumpkin Pie Oatmeal.  

Yes, you read that right.  PUMPKIN PIE OATMEAL.

And NO added sugar.  The only sugar comes from the PURE maple syrup.  Please do not top this with pancake syrup.  Not the same.  AT ALL.  Spend the $6, get a small bottle and once opened KEEP IN THE REFRIGERATOR!

This recipe makes a generous size.  I halved the original recipe that said it made 4 servings.  So, this will either make a very filling breakfast, or split it with someone!  According to the Quaker Oat site I made the correct amount for one serving.  


Ingredients:
  • 1/2 cup Oatmeal cooked, I used Quaker Instant, steel cuts oats would be fabulous!
  • 1/4 cup pumpkin puree NOT pie filling (VERY important)
  • 1/2 tsp. pumpkin pie spice, no sugar added
  • pecans for serving on top, I used pecan pieces
  • REAL maple syrup
Directions:
  1. Cook oatmeal to package directions.  If you are like me, I lost my box, so I included the link to the Quaker site for you.  It has cooking directions.
  2. If not using instant, stir in the pumpkin and pie spice about 5 minutes before it is finished cooking.  If using instant, just pour it in after it has cooked for a whole whopping 1 minute. 
  3. Sprinkle with pecans.
  4. Top with the maple syrup to your liking.  Pure syrup is really sweet.  Add SLOWLY.
Enjoy!!

Sunday, September 18, 2011

The BEST apple pie you will ever eat...seriously.

I go to the Farmers Market every Saturday.  I have a booth there.  There is a little old lady next to me named Selma.  Every week she talks to me about food.  Whether it is tomatoes, corn (her favorite), or lately apples.  This got me thinking about apple pie.

I like apple pie.  It is decent.  But it never really does it for me...until now.  This recipe I found is phenomenal.  Seriously.  The apples cooked to perfection and there was a caramel syrup you poured over....SO GOOD.  Not your traditional apple pie.  No seasonings involved.  AT ALL.  So if you want a pie, but your pantry is lacking, this recipe is for you.

 Ingredients:
  • A pack of refrigerated pie crust.  (I used Pillsbury sheets. If you are adventurous you can make your own crust.) 
  • 1/2 cup unsalted butter
  • 3 tablespoons all-purpose flour
  • 1/2 cup white sugar
  • 1/2 cup brown sugar
  • 1/4 cup water
  • 8 apples peeled, cored, and sliced (Pie quality.  I used Fuji.  I also adore Pink Ladies)
Directions:
  1. Place 1 crust in the bottom of your pie plate.  
  2. Spread your apples into the crust, mounding slightly.
  3. Top the apples with the second crust lattice style.  (I used pie crust cutters from Williams Sonoma and cut leaves out.  Basically you just want something to allow steam to escape and to let your caramel  seep into the pie.  )
4.  Melt butter in a sauce pan. Stir in flour to form a paste. Add white sugar, brown sugar 
    and water; bring to a boil. Reduce temperature, and simmer 5 minutes. 
5. Pour the caramel SLOWLY over the crust allowing it to drain down through the holes.

6. Bake at 425F for 15 minutes.  
7. Reduce heat to 350F and continued baking for 35-45 minutes.  You want it to be 
    browned and bubbly. Place tin foil around the edges of the pie, or use a crust shield to 
    prevent over browning.
Enjoy!


Saturday, September 3, 2011

Chocolate Mint Brownies (Tastes JUST like an Andies Mint)

I am rather addicted to Pinterest.  If you have never been there, you should.  Go now. Click the link, but come right back please!  I have managed to get one of my great friends addicted as well.  The other week she pinned some brownies with the note saying "I think you should make these and I will come over and help you eat them. :)"  So I decided to make them!

Some friends and I started a craft group called "The (Not So) Crappy Craft Club".  Feel free to check it out on Facebook.  Basically once a month we get together and do a cheap and easy craft.  I made these brownies for our first official meeting.  They were a big hit.  They taste JUST like an Andies mint.

Hope you like them! Please don't pay attention to the amount of butter.  It is WELL worth it.

Ingredients: 
Bottom layer:
  • 1 cup all-purpose flour (about 4 1/2 ounces)
  • 1/2 teaspoon salt
  • 1 cup granulated sugar
  • 4 large eggs, beaten
  • 1/4 cup butter, melted
  • 2 tablespoons water
  • 1 teaspoon vanilla extract
  • 1 (16-ounce) can chocolate syrup  (I used 2 cups of Hershey's Chocolate Syrup.)
Mint Layer: (My kids aren't fans of mint.  I think I will substitute Vanilla extract next time)
  • 2 cups powdered sugar 
  • 1/4 cup butter, melted
  • 2 tablespoons milk
  • 1/2 teaspoon peppermint extract 
  • 3 drops green food coloring
Glaze:
  • 3/4 cup semisweet chocolate chips 
  • 3 tablespoons butter
Directions: 

  1. Preheat oven to 350°. 
  2. To prepare bottom layer, lightly spoon flour into a dry measuring cup; level with a knife.  (Never EVER scoop out flour with the measuring cup.  You will pack too much flour into the cup and EVERYTHING you make will be very dense.)  
  3. Combine flour and salt; stir with a whisk. 
  4. Combine granulated sugar, 1/4 cup melted butter, 2 tablespoons water, vanilla, eggs, and chocolate syrup in a medium bowl; stir until smooth. 
  5. Add flour mixture to chocolate mixture, stirring until blended. BATTER WILL BE VERY THIN! 
  6. Pour batter into a 13 x 9–inch baking pan coated with cooking spray. 
  7. Bake at 350° for 23 minutes or until a wooden pick inserted in center comes out almost clean. 
  8. Cool completely in pan on a wire rack.
  9. To make the mint layer, combine powdered sugar, 1/4 cup melted butter, and next 3 ingredients (through food coloring) in a medium bowl.
  10. Beat with a mixer until smooth. 
  11. Spread mint mixture over cooled cake.  
  12. To prepare the glaze, combine the chocolate chips and 3 tablespoons butter in a medium microwave-safe bowl. 
  13. Microwave at HIGH 1 minute or until melted, stirring after 30 seconds. 
  14. Let stand 2 minutes. 
  15. Spread chocolate mixture evenly over top.  It doesn't look like a lot, but it will cover it.
  16. Cover and refrigerate until ready to serve. 
When you go to serve it I would run a knife around the edges so it will release easily.  I found the bottom brownie part slides out easily once the seal is broken from the top edge with the glaze.

Enjoy!


Original Recipe from Mel's Kitchen Cafe

Shephards Pie

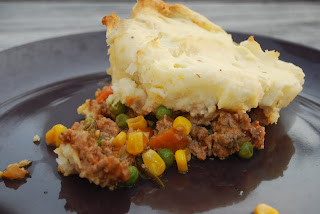
I LOVE the autumn.  I am hoping if I keep making autumn style foods, the weather will cool down faster.  It could work!!

What is more autumn sounding than a big pan of meat, vegetables, and topped with mashed potatoes?  This recipe was SO good.  I am super excited that I found it.  With the amount my husband consumed, I am pretty sure this is going to be a much requested recipe.

Please make sure to read the recipe through.  While the potatoes are cooking you start on the meat filling.  I noted that in the directions!

Ingredients:
For the potatoes:
  • 1 1/2 pounds russet potatoes
  • 1/4 cup half and half
  • 2 ounces unsalted butter
  • 3/4 teaspoon Kosher salt
  • 1/4 freshly ground black pepper
  • 1 egg yolk
For the filling:
  • 2 tablespoons Caonla oil
  • 1 cup chopped onion
  • 2 carrots, peeled and sliced thin
  • 2 garlic cloves, minced
  • 1 1/2 pound ground turkey
  • 1 teaspoon Kosher salt
  • 1/2 teaspoon freshly ground black pepper
  • 2 tablespoons all-purpose flour
  • 6 teaspoons crushed tomatoes ( or 2 teaspoons tomato paste.  I was out of the paste)
  • 1 cup vegetable broth
  • 1 teaspoon Worcestershire sauce (try to say it.  Bet you can't said it just once.)
  • 1 tablespoon freshly chopped rosemary leaves
  • 1 teaspoon freshly chopped thyme leaves 
  • 1/2 cup fresh or frozen corn kernels (I used canned)
  • 1/2 cup fresh or frozen peas
Directions: 
Make the potatoes:
  1. Peel the potatoes and cut into about 1/2in dice.  Put the diced potatoes into a medium size saucepan and cover with cold water.  
  2. Set over high heat, cover, and bring to a boil.  (Start making your meat filling at this point.  See below)
  3. Once boiling, remove cover and reduce heat to a simmer.  Cook until fork tender and easily crushable.  About 10-15 minutes.  Mine were perfect at 15 minutes. 
  4. Microwave the half and half and butter for 35 seconds, or until warmed. 
  5. Drain the potatoes and return them to the saucepan. 
  6. Mash the potatoes
  7. To the potatoes add the half and half, butter, salt, and pepper.  Mash until smooth your desired consistency.  I prefer a few lumps.  Seems just like how mom use to make it.  Lumpy potatoes.
  8. Stir in the egg yolk and set aside.
Make the meat Filling:
  1. Preheat oven to 400F
  2. Place the canola oil in a saute pan and set over medium heat.
  3. Once the oil heat up, add the onion and carrots and saute until they start to take color, about 3-5 minutes
  4. Add the garlic and stir to combine.
  5. Add the ground turkey, salt, and pepper.  Cook until browned and cooked through.
  6. Sprinkle the meat with the flour and toss to coat.  Cook for another minute.
  7. Add the crushed tomatoes, vegetable broth, Worcestshire, rosemary, and thyme.  Stir to combine.
  8. Bring to a boil, reduce heat to low, cover, and simmer for about 10-12 minutes.  You want your sauce to thicken slightly.
  9. Add the corn and peas and stir to combine.
  10. Spread mixture evenly in the bottom of your baking dish.  The dish should be about 11x7.
  11. Top with the mashed potatoes.  Start on the edges and go around, so you can make sure you get a good seal around the edges and to prevent the mixture from bubbling up.  Fill in the middle.
  12. Place on a foil lined cookie sheet and place on the middle rack of the oven for about 25 minutes or until the potatoes are golden on top.  Mine took about 30 minutes to achieve this.
  13. Cool for 10-15 minutes before serving.


Original recipe from Sadie + Stella

Thursday, September 1, 2011

Vegetarian Bean Burritos

I am trying to keep to somewhat of a budget in my house.  I don't really have one, but I try to get the grocery spending to a minimum.  I come up with the ideas and list and send the hubby to the store to do the shopping.  Meat is EXPENSIVE.  We don't do red meat or pork, but chicken can get just as pricey.  Result....vegetarian.  Which I don't have a problem with at all.

There is a local burrito place, Phat Burrito, that if I could eat at every day I would.  Their burritos are huge and awesome.  These are PRETTY darn tasty though.  It might make me rethink about going out for burritos!

Ingredients:
  • 1 cup brown or white rice (or 2 cups already cooked rice)
  • 2 tablespoons olive oil
  • 1 medium onion, diced
  • 3 cloves garlic, finely minced
  • 1 jalapeno, seeds and membrane removed, finely diced
  • 1 teaspoon cumin
  • Salt and pepper to taste
  • 3 tablespoons tomato paste
  •  1 can (15 oz.) pinto beans, drained and rinsed 
  • 1 can (15 oz.) black beans, drained and rinsed
  • 1 1/2 cups water
  • 1 can whole kernel corn, drained
  • 6 green onions, white and green parts finely chopped
  • 1/2 teaspoon garlic powder
  • 1/2 teaspoon onion powder
  • 16 burrito-sized (10-inch) flour tortillas
  • 2 cups shredded Monterey Jack cheese
Directions: 
Cook rice and set aside.

Heat oil in large saucepan over medium heat. Add onion, garlic, jalapeno and cumin. 
Season with salt and pepper. 
Cook, stirring occasionally, until onions are softened and golden, being careful not to let the garlic burn. 

Add tomato paste and cook, stirring for 1 minute.  
Drain and rinse one can of beans.  Add this to the pan and mash.  I used a potato masher.
After fully mashing add the second can of beans and water.  Stir to combine.
Bring to a boil.  Reduce heat to medium and simmer, stirring occasionally, until thickened about 10-12 minutes.  Make sure to stir it well.  You do not want this sticking to the bottom of the pan.
Add corn and cook until heated through, about 2 to 3 minutes.
Stir in the onion powder and garlic powder.
Remove from heat and stir in the green onions and cooked rice.

Follow the direction on the bag to heat the tortillas.

Now...this is the tricky part.  Each tortilla gets about 2/3 cup bean mixture and 1/4 cup cheese.  Put in on the tortilla near one side.  Fold the top down and bottom up slightly.  Then take the side closest to the filling and start rolling it over the filling TIGHTLY, rolling it towards the other end.  Mine turned out ok.  Not the prettiest things, but they tasted great!! 


Top with sour cream and salsa if desired.


Enjoy!!

This recipe makes a lot.  If you plan to freeze these, after rolling them up place on a cookie sheet and put the burritos in the freezer for about 30 minutes.

Once frozen, wrap them individually in plastic wrap and then place in a freezer bag for up to three months.

To reheat:
Remove from plastic wrap and poke a few holes in it.
Microwave for 2 minutes.
Poke a few more holes and microwave for another minute.  
This will be hot!  Be careful!

Original recipe from:  Mel's Kitchen Cafe


Sunday, August 28, 2011

Healthy Pumpkin Pie Pudding

I LOVE pumpkin.  I do not think it needs to be a fall only food.   When I was pregnant with my last child I was diagnosed with Gestational Diabetes right around the fall.  It was a sad sad day.  All the fall foods were on the no no list.  I will make it up this fall and try to find some healthier versions!

This recipe is crazy easy and so good.   This will satisfy your need for pie and it only takes about 2 minutes to make!  Best part?  NO SUGAR ADDED.  Just happy healthy pumpkin and a few other ingredients.  If you wanted to, if you are anti fake sweetener, you could use the real stuff.  You will just have greater calories and more sugar.


Ingredients:

  • 1 large can of pumpkin or two 15oz ones (NOT pumpkin pie filling!!)
  • 1 box instant sugar free French vanilla pudding, small size (regular vanilla would work as well)
  • 1 tablespoon Pumpkin Pie seasoning
  • 1 tub of Sugar Free Cool Whip, thawed (takes about 4 hours.  Plan accordingly)
Directions:
  1. Mix all ingredients together.  All done!


Thursday, August 25, 2011

Garlic Breadsticks, Olive Garden style

According to my son, everything is cheesy.  As in, it has lots of cheese in it.  These have NO cheese, but they sure were cheesy!  Never question a five year old when he is eating something new.  Just nod and say YES.

We typically have homemade pizza night once a week.  Super easy and quick to make.  I was getting really run down and bored with pizza night, so I decided to spice it up a bit and add some garlic bread.  I skipped on over to Pinterest and found a fabulous recipe.  This is from the blog Full Bellies, Happy Kids.

After reading on their blog a bit, I found at that they are having to move their blog due to people stealing their posts and using them as theirs, pictures and all.

It is a shame that people would stoop so low.  That is why I always take my own pictures and give credit to where credit is due.  As I said in my original post, I find recipes, make them to suit my family, and occasionally fiddle around with them enough to be able to claim them as mine.

This would not be that time.  Totally copied it.  Hope you like it!
Ingredients for the breadsticks:
  • 1 1/2 cups warm water (between 110 - 120 degrees F)
  • 2 1/4 teaspoons yeast (one package active dry yeast)
  • 4 1/4 cups all-purpose flour
  • 2 tablespoons unsalted butter, melted
  • 2 tablespoons sugar
  • 1 tablespoon salt 
Ingredients for the topping:
  • 1 stick of butter (1/2 cup)
  • 2 teaspoons garlic powder
  • 1 teaspoon salt
Directions:
  1. In a stand mixer dissolve the sugar and the yeast in the water.  Cover with a towel and let sit for about 10 minutes.  Mixture will become frothy.
  2. While waiting, in a separate bowl mix together the flour and salt.
  3. After the yeast sat for 10 minutes, remove the towel and add the flour mixture.
  4. Add the melted butter.
  5. If you have one, attach your dough hook to the mixer and turn it on 2.  Let it mix everything together, about 20 seconds, then knead the dough on setting 2 for about 2 minutes.  Be careful not to over mix.
  6. Spray a baking sheet with nonstick cooking spray, I used two pans, and divide the dough into pieces.  I made 10 sticks.  I will probably make them a bit smaller next time.  I'll try for 12.  That way I won't feel as guilty eating as many as i did. (Only 2)


     7.   Roll into log form and cover with a towel. Let it rest in a warm place, about 85F
           for about 45 minutes to an hour.  Outside on my picnic table was perfect for this 
           tonight.
     8.  Preheat your oven to 400F.  Once warm, put these in for about 6 minutes.  
     9.  While baking, in your microwave melt a stick of butter (1/2 cup) with 2 teaspoons
           garlic powder and 1 teaspoon salt.  When the timer goes off, brush the rolls with 
          half the butter mixture.
    10.  Put the sticks back in the oven for about 6-9 more minutes.  Just keep an eye on 
          them.  When browned, remove from the oven and brush with the remaining butter
           mixture.
ENJOY!!
      

Wednesday, August 24, 2011

Baked Ziti

My husband is obsessed with this stuff.  He always liked baked ziti, but wanted it cheesier.  This is what came about.  It is pretty freaking fabulous.
 Ingredients:
  • 1 pound ziti/rigatoni (any tubular noodles will do)
  • 15oz. Ricotta Cheese
  • 8 oz. Mozzarella Cheese, shredded
  • 1 egg, slightly beaten
  • 1 teaspoon salt
  • 1/4 teaspoon pepper
  • 3 1/2 cups spaghetti sauce
  • 1/4 cup Parmesan cheese OR shredded mozzarella cheese
  • a few fresh basil leaves sliced, optional
Directions: 
  1. Preheat oven to 375F
  2. Cook noodles according to package and drain
  3. Spread 1/2 cup spaghetti sauce in the bottom of a 13x9" baking pan. (I used a Pyrex one)
  4. In a large bowl mix the Ricotta Cheese, 8 oz mozzarella cheese, egg, salt, pepper, and 1 1/2 cups spaghetti sauce
  5. Add the noodles and stir into the cheese/sauce mixture.
  6. Gently pour the noodle mixture into the baking pan.
  7. Pour remaining spaghetti sauce onto the noodles.
  8. Sprinkle the additional 1/4 cup cheese on top and sprinkle the basil leaves.
  9. Bake for 30 minutes, or until bubbly and browned.
  10. Let cool for about 10 minutes.
ENJOY!!

Friday, August 19, 2011

Cucumber Salad with Sour Cream and Dill Dressing

Oh dear Martha, how do I love thee?  You make the world look so easy and fabulous with all your "good things".  

This recipe is straight off of the Martha Stewart website and wonderful  I cut it in half when I made it for a quick and easy lunch.  So yummy and refreshing.  Any recipe I get to use fresh dill is a winner in my book.


Ingredients:

  • 1/2 cup reduced-fat sour cream
  • 2 tablespoons fresh lemon juice (from 1 lemon)
  • 2 tablespoons chopped fresh dill, plus more for garnish (optional)
  • Coarse salt and ground pepper
  • 4 to 6 Kirby cucumbers (about 1 pound), halved lengthwise and thinly sliced crosswise
Directions:
  1. In a medium bowl, combine sour cream, lemon juice, and dill. Season with salt and pepper, and whisk well to combine.
  2. Add cucumbers, and toss to coat.  If desired, garnish with more dill.  Serve, or refrigerate, covered, up to 4 hours.
Enjoy!

Thursday, August 18, 2011

Homemade Cheese Crackers

Let me say a few things first.  These are AWESOME.  SO SO SO GOOD.  But, if you make these you might go insane.  This was the most frustrating thing I have ever made.   Seriously.  My thumb might never be the same.  You put the dough in the freezer and then roll it out.  Rolling frozen dough is HARD.  The rolling pin slips off the ball of awesomeness and SMACKS repeatedly into your thumb. 

If you have kids either 
a) make these when they are NOT around or b) plan to expand their vocabulary.

This recipe makes a bowl full.  Like the kind of bowl you get when you buy dishes.  A soup bowl.    So it is A LOT of work, for a small amount, yet SOOOO worth it in the end.


Ingredients:
  • 1/2 cup whole wheat flour
  • 1/2 cup all purpose flour
  • 4 tablespoons COLD butter cut into chunks
  • 8 oz extra sharp cheddar cheese, grated
  • 3/4 teaspoon salt
  • 1/4 teaspoon Chili powder
  • Kosher Salt for sprinkling
  • cold water
Directions: 
  1. Put all ingredients into a food processor and pulse until crumbly.
  2. Add cold water one tablespoon at a time until it forms a dough.  Pulsing after each addition.  I used 4 tablespoons.
  3. Form into a ball, wrap in plastic wrap, and place in freezer for at least 30 minutes.
  4. Remove from freezer and let it sit for a few minutes.  This is the hardest part.  Mentally prepare yourself for what you will do next.
  5. Place the ball in between new plastic wrap or wax paper and roll it out.  THIS IS HARD.  My rolling pin repeatedly slipped onto my thumb.  Not an enjoyable feeling.  You want to roll it out until it is a 1/8 inch thick.  Once it starts warming up it is easier. I rolled, smacked, beat, and cursed at the dough.
  6. Place on a cookie sheet and cut with a pizza cutter/sharp knife into one inch squares.
  7. Sprinkle with Kosher Salt.
  8. Bake in a preheated 350F  oven for 25+ minutes.  The original recipe I found said 25 minutes.  I changed the recipe and I had to bake mine for about 29 minutes.  You want to check for crispness.  They will crisp up a bit after you take them out.  Just make sure they aren't soggy.
  9. Remove from oven, cool and HIDE THESE.  They are so good!!
ENJOY!!!

Wednesday, August 17, 2011

Slow Cooker Spinach Pesto Lasagna

I never thought lasagna in a slow cooker could be so good.  I am the type of girl that spends HOURS, cutting vegetables, making the sauce, cooking the meat, assembling.  So I never would have in a million years thought that a lasagna that you just throw together and forget about in a slow cooker could be so good.

But it was.
Ingredients:
  • 1 (26-ounce) jar prepared pasta sauce 
  • 1 (10-ounce) box lasagna noodles (regular ones.  Not the no-boil ones.) 
  • Pesto, or you can buy some.  (11oz) 
  • 1 (15-ounce) container ricotta cheese 
  • 1 (12-ounce) bag baby spinach 
  • 1 cup grated Parmesan cheese 
  • 16 ounces mozzarella cheese, shredded 
  • 1/4 cup water
  • Slow Cooker.  Mine is a 6qt.
*Parmesan cheese is guesstimated.  I sprinkled until it looked good.

Directions:
  1. Put some of the sauce in the bottom of the slow cooker, about a 1/4cup and smooth it around.
  2. Cover the sauce with the RAW noodles.  You will have to break them to make it fit.  Rectangle noodle will not fit perfectly in a oval slow cooker, unless you are Chuck Norris and then the noodles will bend for you.
  3. Spread some ricotta on top of the noodles to cover.
  4. Spread some pesto on the ricotta.
  5. Sprinkle about 2 handfuls of baby spinach on top.
  6. Sprinkle the Parmesan Cheese.
  7. Sprinkle on the Mozzerella Cheese.
  8. Spread some pasta sauce.
  9. REPEAT until you use everything up ending with a cheese layer. I got three layers. 
  10. Take the 1/4 cup water and put it in the pasta jar.  Shake, then pour over the top.
  11. Cover and cook on high for 3 to 4 hours or low for about 6 hours. 
  12. It is done when the top is browned and bubbly.  It also pulls away from the sides a bit.  Let sit for 10-15 minutes before eating.   Enjoy!! 

Pesto

Just a basic pesto recipe, with a little twist on the original.
Ingredients:
  • 2 cups fresh basil, packed
  • 1/3 cup pine nuts and chopped walnuts, mixed (or just choose one type.  I did half and half)
  • 1/2 cup grated Parmesan-Reggiano or Romano cheese
  • 1/2 cup extra virgin olive oil
  • 3 medium sized garlic cloves, minced
  • salt and pepper to taste
 

Directions :
  1. In a food processor add the basil and nuts.  Pulse a few times.
  2. Add the garlic and pulse a few more times.
  3. Turn on the food processor and slowly add the olive oil, while it is running.  Make sure to stop the machine and scrape the sides down so you get it all mixed together.
  4. Add the cheese and pulse again until blended.
  5. Add salt and pepper to taste.
Enjoy!

Broccoli & Cheese Souffle

Holy Moly Batman.  These are GOOD.  I found this recipe and I was planning on making them for Veronica.  They sounded good and all.  The minute we gave them to her she started INHALING them.  I made my husband try it.  Just because I wanted to try it and it was labeled as a baby food recipe on the site I found it on and well...I am picky.  He tried it and said it was good.  I gave it a shot and let me tell you this is SOOOO good.  True babies can eat it, but I bet you will eat them too!

Ingredients:
  •  1 cup of ricotta
  • 1 cup mozzarella
  • 1/8 cup parmesean cheese
  • 1 10 ounce package of frozen chopped broccoli (I used florets and chopped them up well) 
  • 2 eggs (or 4 egg yolks)
  • 1 teaspoon of pre-minced garlic (Best invention EVER)
  • 1/2 teaspoon pepper
  • 1/2 teaspoon of fresh rosemary, chopped
  • 1/2 teaspoon of fresh basil, chopped
Directions:
  1. Thaw and drain the broccoli.  Make sure to get as much water out as possible.  I put mine between paper towels and smooshed it.
  2.  Preheat oven to 350F and spray a muffin tin with nonstick spray.
  3. In a bowl beat the eggs until foamy.  My hand mixer has a whisk attachment.  I used that.  It fluffed them up nice and quick.  You can also push down and make sure you get the stuff on the bottom foamy as well.
  4. Add the cheeses, pepper, and herbs.  I gave the mixture a quick beat with the whisk attachment again to mix it all together.
  5. Fold the broccoli into the egg/cheese mixture until just combined.
  6. Divide evenly in the muffin tins.  Mine filled all 12 holes halfway.
  7. Bake 20-30 minutes.  The original recipe said 20-25minutes.  I changed this a bit so mine had to stay in longer.  Mine went for 28 minutes.  From about the 20 minute point I would just keep an eye on them.
  8. Serve warm.  But I best these would be just as yummy chilled!

mmhmhmhmmm...

Sunday, August 14, 2011

Fruit Oatmeal Bars

I just had to put the most important thing first.  The picture.  These are phenomenal.  

I had frozen strawberries and blueberries from earlier this year so I threw those in.  I am planning on making more this week.  I think this time around blackberries are in order.  I'll let you know how those turn out!  I am SO glad I found this recipe.  

I made these in two separate pans.  I had an 8x11 and a 9x5.  I had enough base, but not enough filling.  So I increased the filling. But honestly...can you ever have too much berry goodness?

Ingredients:
  • 1 cup rolled oats, divided*
  • 3/4 cup whole-wheat pastry flour (or run regular whole wheat flour through a sifter a couple of times)
  • 3/4 cup all-purpose flour
  • 1/2 cup sugar
  • 1/2 tsp. salt
  • 4 tbsp. cold unsalted butter, cut into small pieces
  • 1 large egg
  • 2 tbsp. canola oil
  • 1 tsp. vanilla
  • 1/4 tsp. almond extract
*3/4 cups oats for the base of the bars and 1/4 cup oats for the topping

Fruit Filling Ingredients:

  • 6 1/2 cups  blueberries, raspberries, cherries, blackberries, strawberries, fresh or frozen, divided*
  • 3/4 cup orange juice
  • 1 cup sugar
  • 1/4 cup and  2 tablespoons cornstarch
  • 1 cup orange segments
  • 1 1/2 tsp. grated orange zest
  • 1 tsp. vanilla
 *VERY versatile recipe.  Just choose what you want to use.  I did mine half blueberry and half strawberry

 Directions:
  1. Preheat oven to 400 degrees (F).
  2. Put the oats in a blender or food processor and run until finely ground. Transfer to a bowl and stir in both flours, sugar and salt.
  3. Add chunks of butter and use a pastry blender or you fingers to incorporate it into the flour mixture until crumbly.
  4. Whisk egg, oil, vanilla and almond extract in a small bowl. Pour into flour mixture and stir until it everything is combined. It will be crumbly.
  5. Transfer 1/2 cup of the mixture to a small bowl and stir in the remaining 1/4 cup rolled oats (or nuts or a combination of the two). Set aside for the topping.
  6. Line a 9×13″ or two 9×5″ pans with foil or parchment paper. Spray the lined pan with cooking spray. Spread the dough evenly in the pan and press firmly into the bottom to form a crust. Set aside.
  7. Combine 4 1/2 cups berries, orange juice, sugar and cornstarch in a large saucepan. Bring to a simmer over medium heat, stirring constantly until the mixture is very thick, 4 to 5 minutes. This could take up to 10 minutes if you started with frozen fruit.
  8. Stir in the remaining 2 cups of berries, oranges, orange zest and vanilla.
  9. Spread the fruit filling over the crust. Sprinkle the reserved topping over the filling.
  10. Bake the bars for 15 minutes. Reduce oven temperature to 350 degrees and bake until the crust and topping are lightly brown, 25 to 30 minutes.
  11. Let cool completely before cutting into bars, at least 1 1/2 hours.

12.  After cooling I removed the bars by lifting them out of the pan by the tinfoil.
       Then I placed them on a cutting board and cut these with a spatula. 
13.  Once cut I wrapped these individually in plastic wrap and stored in the refrigerator.

Enjoy!

Back to the Cutting Board